warmly thank Savior, who gave me the opportunity to make known my own work through his blog.
Tuesday, October 26, 2010
Cleaning A Flintlock Muzzleloader
Un mio quadro pubblicato su "www.disegnoepittura.it", che onore!
warmly thank Savior, who gave me the opportunity to make known my own work through his blog.
Thursday, October 21, 2010
Why Does Bone Heal Faster Than Cartilage
Come rinnovare dei copri presa con la termoformatura.
Hello everyone!
Following the wave of "renovation" I'm about to introduce a new invention to recycle what we already have at home without replacement.
This time I present a nice tutorial on thermoforming.
To begin with we need a few things:
E' composto da un piano fisso che serve da camera del vuoto, al quale va attaccato il bidone aspira tutto (che tra l'altro, ha come nome di fabbrica BID-ONE...haha, stanno peggio di me!).
So we are left with:
When it became pretty red, we turn over the paper and wait for the time necessary to soften it.
(small note: the sheet of PVC phases in the heating. In first there is a tendency, then slowly "loose" and tends to soften after a while 'is white and come to this' last point, it becomes unusable so beware!)
Then they cut out and painted the inside with acrylic paints.
You can make every color! then viola ...
... or burgundy, or, orange!
Small premise:
What we see today can be dangerous if done carelessly.
So be careful!!

Following the wave of "renovation" I'm about to introduce a new invention to recycle what we already have at home without replacement.
This time I present a nice tutorial on thermoforming.
To begin with we need a few things:
- constructing machinery for thermoforming (there are some projects around the internet).
- Purchase a DIY a sheet of clear PVC to 0.4 mm (it is not easy ... vero, ho girato per giorni!!!).
- Comprare un bel bidone aspiratutto che, come suggerisce vagamente il nome, aspira TUTTO!
- Trovare una resistenza per forno.
- Armarsi di santa pazienza.
E adesso vi presento i pezzi uno ad uno.
Quella che vedete sopra è la presa da termoformare...può essere di qualsiasi materiale, basta che sia un po' resistente al calore.
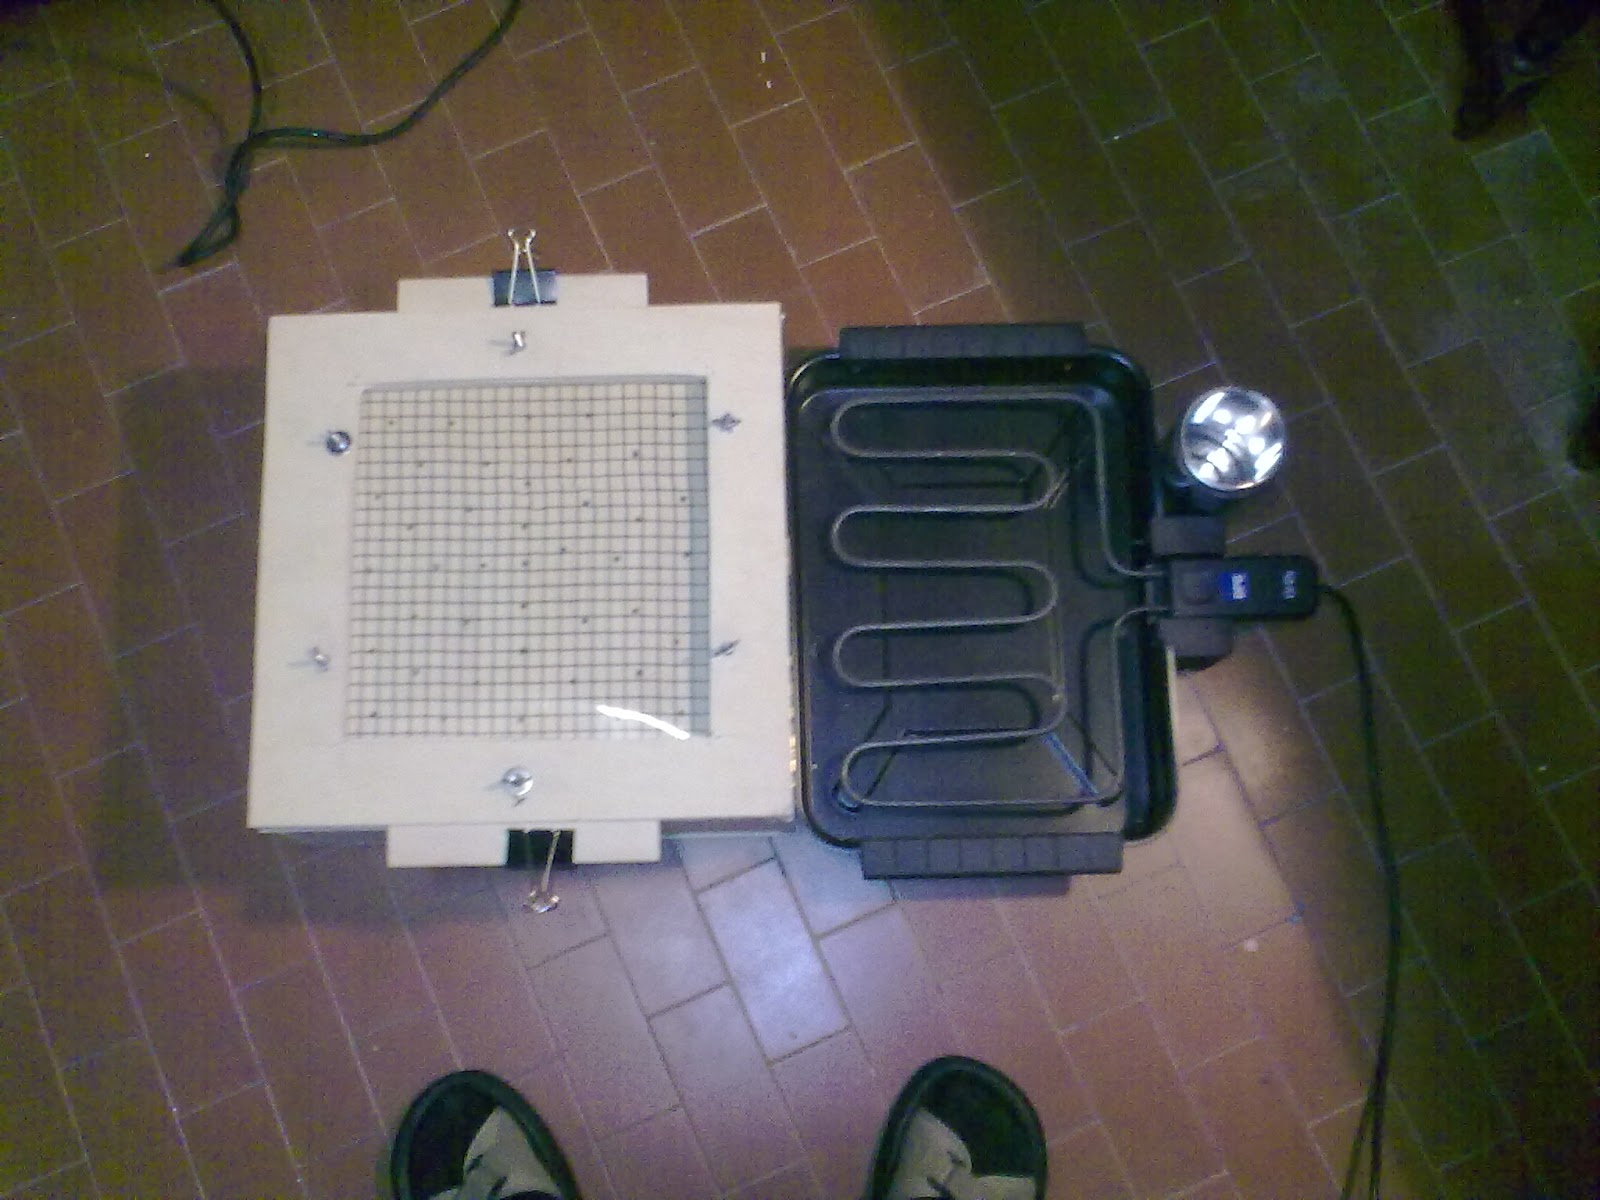
Di seguito il macchinario.
With a zipper, attached to this box with holes, there is a frame that will host the PVC sheet.
This setting toggles between the coil and the lodge floor, where the object to be printed. So we are left with:
- Place the PVC sheet in the frame.
- tighten the clamps. Turn
- resistance.
When it became pretty red, we turn over the paper and wait for the time necessary to soften it.
(small note: the sheet of PVC phases in the heating. In first there is a tendency, then slowly "loose" and tends to soften after a while 'is white and come to this' last point, it becomes unusable so beware!)
the paper is folded on a steam (I have previously turned on the drum) and 3 outlet covers thermoformed!
You can make every color! then viola ...
Spero che il tutorial sia stato di vostro gradimento e...
Buon divertimento!
Tuesday, October 5, 2010
Hack For Mount And Blade Warband
Come rivestire una sedia / poltrona PARTE SECONDA
Finalmente è arrivata la stoffa e così, dopo aver testato la lunghezza, la larghezza, il colore, la caratura, l'odore, la resistenza, ed altre cinque cose che ora non ricordo, ho preso coraggio ed ho cominciato a fare le "cose per bene".(anche se sinceramente sono più portato per farle "alla come viene perché altrimenti perdo di entusiasmo e non le faccio più).
Ma vediamo come procedere.
Now is the time of the elastic.
You have to let a piece of fabric to be sewn into most (if after putting the first pins and sewing by hand) to form a kind of ... tube within which is a stretch of 5 mm.
I am very pleased with how I managed to line the armchair.
I hope others will be challenged in order to be able to have some more tutorials!
Hello everyone!
Andrea
Finalmente è arrivata la stoffa e così, dopo aver testato la lunghezza, la larghezza, il colore, la caratura, l'odore, la resistenza, ed altre cinque cose che ora non ricordo, ho preso coraggio ed ho cominciato a fare le "cose per bene".(anche se sinceramente sono più portato per farle "alla come viene perché altrimenti perdo di entusiasmo e non le faccio più).
Ma vediamo come procedere.
Il concetto è lo stesso del post precedente:
- si poggia la tela sulla sedia
- si tende e si appunta con gli spilli
- si procede ad una prima cucitura a mano con un filo più spesso
Una volta terminati i mille punti da mettere, si passa ai mille risvolti, quindi va girata di qua e di là fino ad avere un quadro della situazione il più possibile chiaro e sereno perché il passo successivo è:
Cucire tutto machine.
is not easy and I must thank my mother for help, the end result should be like this:

But it's over.
The chair also has arms that are attached with 3 screws ... and how do you pass three screws through the fabric?
with holes of course! What
but must protect with the slots.
I put two pictures because it took a lot of time on her hand and I want to gloat for good!
You have to let a piece of fabric to be sewn into most (if after putting the first pins and sewing by hand) to form a kind of ... tube within which is a stretch of 5 mm.
I am very pleased with how I managed to line the armchair.
I hope others will be challenged in order to be able to have some more tutorials!
Hello everyone!
Andrea
Subscribe to:
Posts (Atom)